Lettuce Overwintered Under the Sheets

We love salads! Lettuce can be part of most every meal and we never get tired of it. That’s why there’s a large patch of it in the front yard where the rest of the garden is. Our plants need sun to grow well and, well, the front yard gets more sun than the back yard, so that’s where we do our planting.

It was an experiment to overwinter the lettuce. We know it’s a cold crop and that lettuces will grow down to 40 degrees Fahrenheit. Any colder than that and their growth is probably very, very slow.

In prior years a collection of windows were stacked around the fall-planted lettuce to extend the growing season. During the autumn the windows made for a nice little hot box heating up the daytime temperatures and protecting the plants at night from frost. Once the bitter cold winter weather came the hot box no longer functioned as one and the lettuce plants went dormant near the end of the calendar year.

Last season instead of the windows we used a sheet, a piece of muslin cloth, and an old sheer curtain to cover the lettuce patch. The muslin and cotton sheet were thicker material than the thin sheer curtain. I didn’t think the sheer material would work as well to protect the plants from freezing weather, but to my surprise it did. All three pieces of cloth material performed their protective duties well.
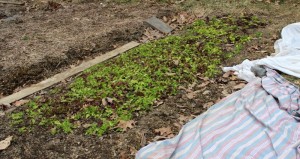
overwintered lettuce
Lettuce planted in October is starting to re-grow in March.

Even though the ground around the lettuce was frozen and even though these plants under the sheet were covered with snow at times, they survived quite well. Twice in January leaves were cut from these plants for salad and since then they’ve been mostly dormant. They are almost getting warm enough to start re-growing.

The cloth coverings were lifted off the lettuce after each snowfall. It might have been a couple to a few days that the lettuce had to bear the weight of the snow, but when the covers were taken off the plants seemed to fair ok. Sometimes the leaves appeared a little wilted, but that’s nothing that a bowl of icy water can’t take care of, if you want to eat crispier leaves.

The only caution I have is to mention that the weight of the snow on a large piece of material can be quite heavy. With large snowfalls the snow may have to be taken off the coverings with the help of a shovel or old broom. If the snowfall is light, simply flipping the sheets back will work just fine. Sometimes a little snow would get on the plants and that didn’t seem to be a problem.

The dill seed that germinated and started growing in the fall lasted into December. Dill mustn’t be as cold-hardy as the lettuce plants as it disappeared in January.

We successfully overwintered lettuce and will have leaves to cut for the kitchen in a couple of weeks. Yum!
Harvest Garlic in the Heat of Summer

Garlic and onions in fried potatoes served with a few slices of garden fresh tomatoes makes a breakfast fit for a queen. It makes the whole house smell good, too. Potatoes and rice always seem better with a little garlic thrown in there.

We’re not talking about powdered garlic or dehydrated flakes of garlic. Only real garlic cloves will give the strong flavor and aroma that we seek.

If you like garlic as much as we do, then you really should be growing your own. It doesn’t take much effort to grow garlic and once it’s established you’ll likely have it forever.

Once the heat of summer is upon the garden garlic bulbs start maturing. They may send up a strong central stalk with a flowering head that will produce several baby garlic bulblets. The bulblets can be planted as can the cloves from the underground bulbs.

Cut off the flowering stalk before the flowers develop so that the plant’s energy will go into producing bigger garlic bulbs in the ground instead of tiny bulblets in the air.

The trick in growing garlic that will store well is to harvest it at the right time. Garlic bulbs have to mature in their second year, at least at our northern Pennsylvania location, so it’s a long-growing crop. If you do it right though, there should be no problem having garlic year round.

Watch the lower leaves of the plants as they dry and turn brown. Some plants will mature sooner than others and they may have to be pulled out first. When two or three sets of leaves have turned brown or died back, it’s time to harvest the garlic. Use a pitchfork or similar tool to pry up the garlic bulbs. Shovels tend to bruise or cut the bulbs and you don’t want that. Pulling up the plant with your hands may not work either as that often breaks off the bulb in the ground.

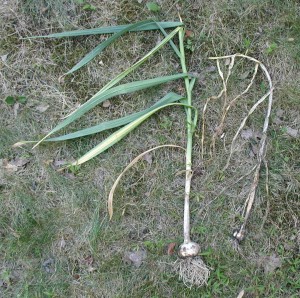
The garlic plant on the left was harvested at the proper time and its bulb remains intact. The plant on the right was harvested too late. Note that its leaves are all brown and dry.

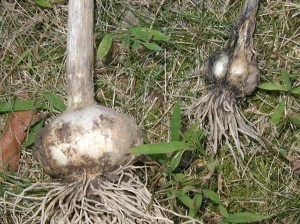
The garlic bulb on the left was harvested at the proper time for good storage while the bulb on the right was harvested too late.
The garlic bulb on the left was harvested at the proper time for good storage while the bulb on the right was harvested too late. Note that the individual cloves exposed to the air will not keep well.

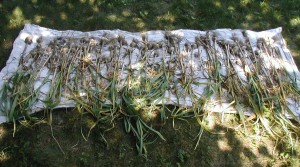
Once the garlic is out of the ground knock off clumps of dirt with your hands and lay the plants in a single layer on a sheet in the shade. Don’t dry the garlic in the sun as that will be too hot and take away some of the essence of the pungent plant that we’re trying to harvest.

Garlic harvest drying in the shade.

If left in the garden too long or when conditions are too wet, the outer leaves, and therefore the outer membrane-like layers that cover the garlic bulbs will disappear. For the best storing garlic we want to retain as many layers as we can for covering the garlic bulbs.

In 2012 the harvest date for our Pennsylvania garlic was the 10th of July. It’s been a very hot summer and not very wet, so that may be an early harvest date when compared to other years.