Herb Harvesting Time Before Summer Begins

The kitchen herbs have grown tall and some have already been harvested, like Chamomile. Just before the calendar says it’s summer, it’s time to harvest some herbs. We have peppermint, spearmint, oregano, thyme, lemon thyme, lemon balm, catnip and anise hyssop to harvest.

A great time to harvest herbs is right before they start flowering. It seems that the combination of plant chemicals changes during flowering and that means the scent and flavor of the herb will be altered, too. For example, basil attains a more spicy, astringent flavor after the plant flowers and that’s not what we like. To keep basil going strong and growing more leaves instead of flowers, pinch back the growing ends before the flowers are developed.

A few herbs we harvest as we need to use them. For one thing, some herbs like parsley and tarragon just don’t retain their scents very well upon drying. If there is an abundance of these herbs, a few springs will be cut, placed flat in freezer bags and zipped closed. Then, when needed all we have to do is take them from the freezer and snip off some parsley or tarragon. Freezing the herbs in this manner will retain much of their dark green color and much more of their fragrance – not to mention the good-for-you anti-oxidants – than drying them will.

Harvesting the herbs amounts to a few steps and it’s easy. After mid-morning or until about noon, the herbs will be cut with scissors, a sharp knife or pruners, depending on how thick the stems are. Don’t harvest first thing in the morning so that the moisture from the night air has had time to dissipate. Then, small bunches will be tied together and hung upside down to dry.

Alternatively, if there is a lot of plant material to dry, the herbs will be laid out on trays or newspaper in the shade. After a few hours the herbs will be turned over to allow all parts to dry. Turning will continue once or twice a day until the herbs are dry enough to be tied in bunches for hanging storage. Some herbs will have their leaves stripped from the stems and saved in glass jars for making teas.
Chamomile First Harvest

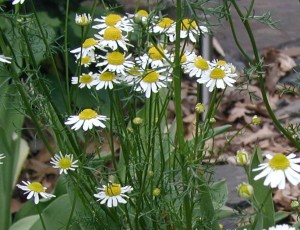
It’s the beginning of June and it’s time to harvest some chamomile as it’s grown and bloomed beautifully. Dozens of flowers held over the spicy apple scented foliage have lost their petals while dozens more hang onto them.

Chamomile in full bloom.
Chamomile in full bloom. Photo taken 13 May 2012.

Rain was plentiful this past week and that may have ruined this crop of flowers for tea. We’ll see if the flower stems upright themselves with the sun – if it comes out today here’s what I’ll do:

Cut the flower heads off with a sharp pairs of scissors and collect the cut flowers in a brown paper lunch bag. Indoors, spread the flower tops in a single layer, as much as possible, on brown paper-lined cookie sheets. It might be helpful to shake or jiggle the cookie sheets to turn the flowers for even drying.

Wax paper could be used instead of brown paper. We’ll use wax paper to cover the chamomile overnight. The next day the flowers should appear more shriveled than the previous evening. Shake them lightly and allow to sit open to the air for the day and cover again at night.

After 3-4 days the flowers won’t appreciably change appearance, so the bulk of the moisture would be evaporated at that point. To be sure that the harvest is totally dry before storing, the flowers will be dried for a week before being transferred to a large mason jar with a holey lid that allows for further drying.

The amount of time it takes to fully dry chamomile for tea will depend on your specific conditions, including the prevailing weather and condition of the herbs to dry. For instance, were the flowers still damp from the morning dew when they were harvested (they shouldn‘t be) or is your location very humid? In both cases the herbs will take longer to dry because they’re starting with more moisture.

Take note: Dry herbs with air movement. Use the shade outdoors with a breeze. Don’t dry herbs in the sun as that can bake some of the essence right out of the plant material. If indoors, use a fan to move the air gently.

How do you know it it’s dry enough? Guess! My rough estimate is like the comment above, where the appearance of the plant material doesn’t change shape or color from one day to the next. As moisture is removed from the plant the leaves and petals wilt into twisted, skinny shapes and the brightness of colors fade into muted shades.

When the colors have faded and the leaves feel dry to the touch, it’s safe to transfer the herbs to ventilated storage containers. We like to use mason jars because we always have some around the place for our canning adventures, like making elderberry jelly. The lids can be lightly closed to allow further moisture release.