Parsley Second Year Biennial Herb Garden

Parsley is one of the herbs that we always have growing. Sometimes it’s planted in the vegetable garden and other times it’s planted with the herbs along the walkway. You’ll need growing space of at least 1 sq. ft. for one parsley plant.

Parsley is a biennial plant, one that grows for two years, flowering in the second year. It will overwinter here at Zone 6, but I’m not sure how far north you can go and still get the second year crop. Further north parsley is probably treated as an annual by planting it each year. To protect it over the winter, we pile up leaves all around the parsley plants and perennial herbs.

The first year is pure vegetative growth. The plant will get larger and bushier. When the stems are too long they won’t remain erect and droop out to the sides, making the parsley plant into a large round shape.
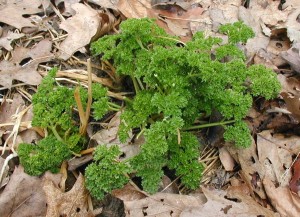
Parsley second year right after overwintering.

Second year growth is primarily involved with sending up a flower stalk. Biennials require some sort of winter period of dormancy before they can flower. During the second year you should harvest as early in the year as possible because the plant will put most of its energy into creating the flower stalk, flowers and seeds, not in producing more parsley leaves.

Bolting is the term given to the rapid growth of the flower stalk in the second year. Once the plant has bolted, you might as well find another parsley to transplant. After bolting and setting seed the parsley plant dies.

Harvest any of the parsley as it grows. You can use scissors or just your fingers. The stems are pliable enough to let you just pinch off a piece. Snip off a sprig here and there for garnishes.

Before the flower stalk gets too tall, we usually harvest most of the parsley and put it in freezer bags, as is. Once frozen, you can use scissors to snip off some parsley for your soup or potatoes when ever you need it, and re-freeze the remaining parsley.

Reblog this post [with Zemanta]

Harvesting Herbs: Catnip Drying for Storage

Early this morning the low temperature was 47 and sunshine is on tap for today. A great day for harvesting a few herbs and drying them in the sun.

After the morning chill is gone and the sun warms everything a bit, we’ll take the scissors or pruners to cut down some herbs. If the plant is an annual, it’ll be pulled out of the ground and the excess soil removed from the roots.

Large stems or whole plants will be draped over a wire mesh for drying. Bulky plants will be turned every so often or trimmed down so that air can circulate around the plant parts we want to collect.

Once the plant seems dry to the touch, it can be manicured or clipped into smaller pieces.

Catnip was harvested a couple days ago by pulling out the entire plant. The three feet tall stems were laid on a piece of (untreated) plywood in the garage. The stems were turned about once a day so that all parts could dry out. After three days time the plant was almost completely dry, except for a few tips of the stems.

At this point a large, black plastic bag was laid out flat. The purpose of the bag was to give a clean surface on which to collect the dried herb. Each stem was manicured by cutting off the flowering spikes and leaves, which were allowed to fall onto the plastic bag.

Leaves that had turned brown – the catnip plant was drying up from the bottom as it concentrated on flowering and producing seeds – were stripped off and placed in a separate pile from the dried green herb. The brown leaves will go to the cats and the green leaves will go into tea. When you strip leaves from the stems try not to crumble the leaves so the herb’s essence will remain intact.

The cut catnip was allowed to lay out on the plastic bag for another day before being collected into small brown bags for temporary storage. Each bag was labeled with “Catnip – September 2008”. Catnip for tea will be stored in a glass container inside a cupboard.

What are you going to harvest today?