Big Orange Spider in the Garden

What’s an orb weaver anyway? Some kind of spider that weaves large round nests!

This one drew my eye because of its bright orange color. Who wouldn’t notice that bright color crawling on the ground?

Orange Orb-weaver Spider in the Garden

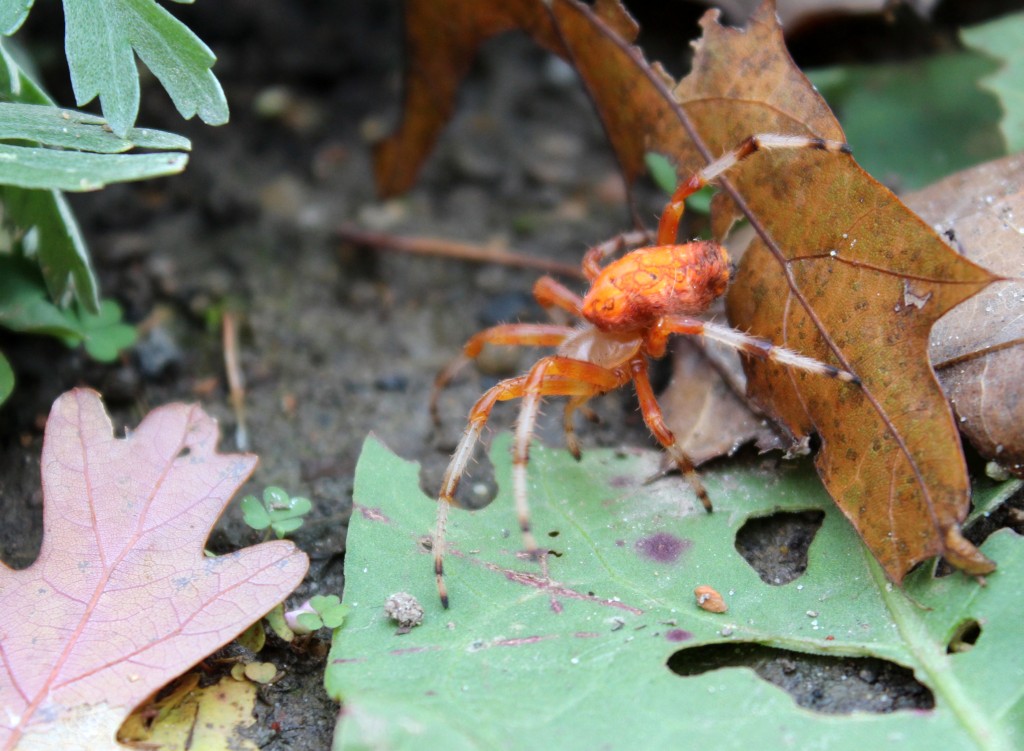
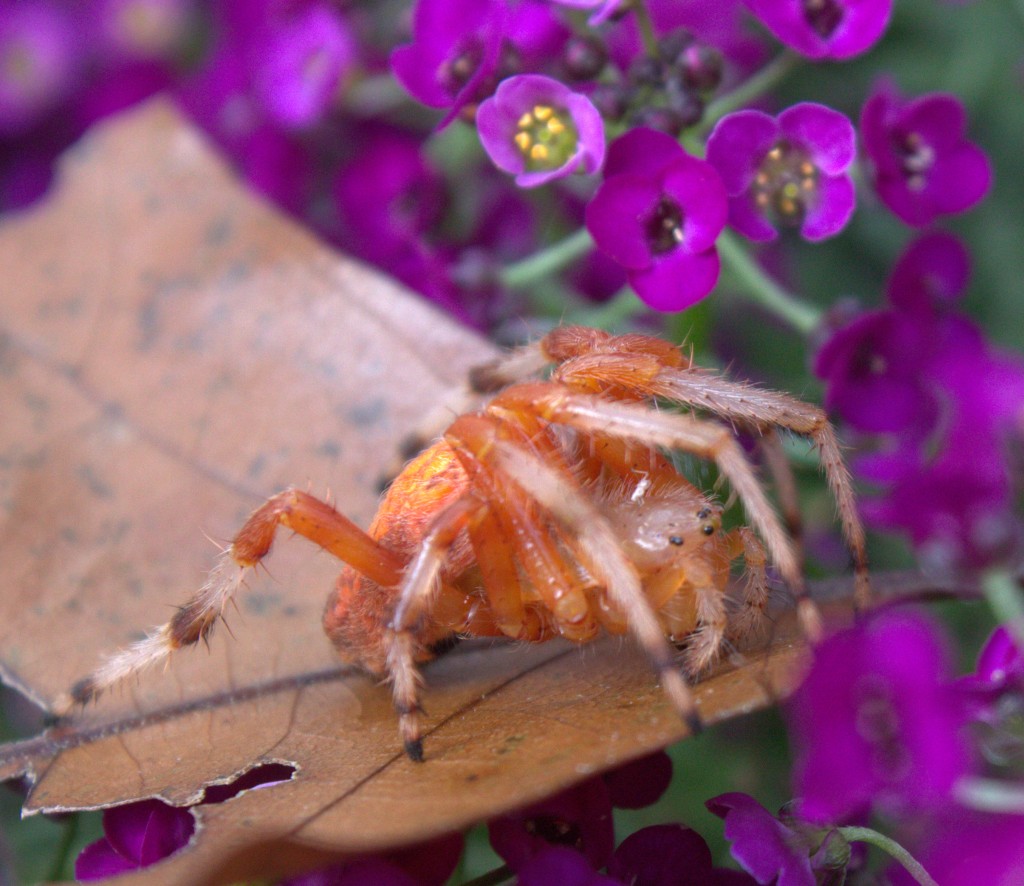
It tried to hide from me by creeping under an herb but I wasn’t done inspecting it yet. I scooped her up with a brown oak leaf and carefully placed the spider among the purple and white flowering alyssum next to the garden.

Marbled Orange Orb-weaver Spider with Long Legs

This orb-weaver was also a big spider — on the size of a mature garden spider. Not tarantula big, but it was larger than most house spiders.

Female Marbled Orb-weaver Spider

It turns out this is a fairly common spider known as the Marbled Orb-Weaver, Araneus marmoreus. It’s a member of the spider family Araneidae, which includes thousands of species of spiders.

The orange color may make you think this spider is toxic, but it’s not. Not dangerous or toxic to you or your pets.

Adults do not overwinter. The species survives winter as eggs protected by a silken cocoon. Young spiders emerge from the cocoon in spring and grow into the adult forms by the middle of summer. Adults can be seen then until the first killing frost in autumn.

Seeing as it was late October when this female spider was photographed, she may have just laid her egg cocoon as her contribution to the survival of the species. If we look around this area next summer or fall we might be able to find her offspring. (The images above were taken in Central Pennsylvania on 30 October 2015.)

As gardeners we try to leave spiders alone. Sure, they’re kind of creepy and some people are quite afraid of them, but they do have a job to do. When that involves eating some of the garden pests, or irritating buggers like mosquitoes, I’m all too glad to let them live.

Go free! Eat and be merry!

How To Make Chili Sauce

The Chili Sauce recipe here is so good you’ll eat it on everything! We eat it on eggs, potatoes, roast beef, ham, chicken and sandwiches.

Inside a grilled cheese sandwich is a favorite way we enjoy this chili sauce.

Chili Sauce For The Pantry

With just the right amount of ground cloves and cinnamon mixing with the rich tomato taste, who needs ketchup?

The recipe makes half a dozen pint jars, depending on how thick you let it get. We’ve had 5 to 7 jars prepped from every batch with a little left over for sampling the day it’s made. 🙂

Be prepared to take up the WHOLE day making it though. It does take several hours for so many tomatoes to cook down to a thick sauce. A crock-pot could be used to advantage here, but I don’t have one so I use a kettle on the stove instead.

Chili Sauce Recipe

12 tomatoes
3 onions
2 hot peppers
1 c. sugar
1 c. white vinegar
1 tsp. ground cloves
1 tsp. cinnamon

Ingredients For Chili Sauce

Chop the tomatoes in bite-size pieces. This makes the tomato skins that make it through processing a manageable size in the finished product.

Put all ingredients into a large stock pot or crock-pot and bring to a boil.

Of course you can make it hotter depending on how many and what type of peppers you add. At different times we’ve used jalapeños, tiburons, chili peppers, or even mild peppers with a sprinkling of cayenne pepper flakes.

Once boiling, turn the heat back to a simmer, but not too low. This part is important.

You want to cook out most of the water from the vegetables so the heat setting can be a little higher to start with as there is more water in the mixture at the beginning. As the mixture is cooked steam comes off so the sauce becomes less watery as you go.

The sauce can easily scorch if the heat setting is too high, especially when it starts to thicken.

Chili Sauce Reduced in Volume After Cooking For A Couple Hours

What works on my stove is to bring the vegetable mixture to a boil on high heat, then turn the heat back to about 8 o’clock (if the stove dial was a clock face) or medium-low.

Make sure to stir the mixture occasionally, taking note of the thickness of the sauce. When the sauce has reduced in volume by a couple of inches in the pot, turn back the heat a notch or two to prevent scorching.

Keep stirring and checking the sauce consistency. When it seems THICK, it’s time to can it.

7 Jars of Chili Sauce in a Water Bath

Ladle into hot jars and process in water bath for 15 minutes. Put the lid on the water bath during this sealing process.

If you’re lucky enough to have lots of tomatoes at the end of the growing season, making this chili sauce is a great way to use up those extra tomatoes.

Note: A friend reported that she used this recipe with green tomatoes and was very pleased with the outcome. Just saying!